27 December, 2009

Fail: Meyer Lemon Sorbet Elise at Simply Recipes dot com

I am an avid reader of David Lebovitz for those of you who do not know him, check him out.  He has a fun blog and a great writing style, not to mention he is a great pastry chef.  He recently wrote about Meyer Lemons and although I had heard part of the story I must admit I did not know all of it.  I was told that they were a hybrid between an orange and a lemon, but not all the rest.  For the rest of the story and a wonderful recipe for Lemon Curd click here, Link to DL Curd 


We have three dwarf Meyer Lemon trees at the house in California and neighbors with lots more.  So I am always either picking them from our trees or having them left on more door in hopes of returned treats.  I have made other things but I LOVE MEYER LEMON SORBET!  So I make it when I can.  

Basically you make lemonade and then freeze it.  I have a KitchenAid mixer with the ice cream attachment, which could not make ice cream and sorbet marking easier.  

You pick the lemons, then lots of zesting and then lots of juicing, which I do by hand first with a zester then with a reamer and a strainer.  

It is a messy job so I would suggest doing this over a sink with lots of towels nearby for spilling.  Wear gloves if you are making a lot, as the lemon juice will burn after a while.  I have enough here to make about 6 pint sized containers of sorbet, about 2 liters of juice.
So after about an hour and probably close to about 40 small to midsized lemons I had a mess, some juice (about 2 liters) and some zest.  


But the house smelled great and they do make pretty pictures.


Now I had more than I needed but with a vision.  I first made the recipe as written knowing that it would be too sweet for my taste.  The nice thing about making this recipe is you actually can taste it before the freezing, so you know what you are gonna get.  Most of the recipes I have seen for this call for 1 to 1 ratio of Simple Syrup to Lemon Juice.  I think that is WAY TO SWEET!  I like my lemon sorbet with a bit of lemon tartness.  So the first batch I made 1 to 1 and gave it to neighbors, who loved it.  The second batch I made 1 liter of lemon juice to 3/4 liter of Simple Syrup.  In both cases I added the accurate called for amount of lemon zest, which I think adds a nice punch to it.  

So really this recipe as written could be a success for some, if you like your lemonade sweet.  If you are like me and enjoy bitter things (let the comments fly) then I would say this recipe is a kind of fail with a slight correction for taste.  

Using 2 liters of juice and 1.5 liters of simple syrup will create 6 pints of sorbet.  The mixer's freezing bowl needs to freeze between batches so you make enough for 3 pints (1 liter juice to 3/4 liter syrup and zest) and then make the second later after the bowl freezes again.  After the mixer is done (the exterior condensation ice line will melt to the top of where the sorbet begins) you will need to put the pints of sorbet in your freezer to finish it off as they will be slushy not frozen all the way. I put a layer of plastic wrap touching the sorbet in each pint before I put the lid on it and place it in the freezer.  


Meyer Lemon Sorbet Recipe
INGREDIENTS
1 cup sugar
1 cup water
1 cup freshly squeezed juice from meyer lemons (about 3-4 lemons)
2 teaspoons fine lemon zest
METHOD
1 In a small saucepan on medium high heat, make a simple syrup by heating sugar and water until the sugar has completely dissolved. Remove from heat and let cool. Mix in the lemon juice and zest. Chill, either in the refrigerator, or by placing in a metal bowl over an ice bath.
2 Once the mixture has thoroughly chilled, freeze in your ice cream maker according to the manufacturer's instructions. If you don't have an ice cream maker, you can pour the mixture into a shallow pan and freeze in your freezer until semi-solid. Then take a fork and fluff it up, returning it the the freezer to freeze firm. Then put in a food-processor or blender to process until smooth.
Place sorbet in an airtight container and freeze until ready to serve.
3 Scoop out preferably with a melon-baller. Garnish with mint. Makes 2 1/2 cups.

FAILURE! 

22 December, 2009

Success: Sweet Potato and Gruyère Soufflé Gourmet Magazine 1992

So tonight I am back from a great trip in Seattle.  I came back to an empty fridge with the exception of a wedge of Gruyere and a stack of sweet potatoes.  I have seen one of these on Martha but I am a huge fan of the now defunct Gourmet Magazine so to honor the work they did I decided to make this one.
The recipe was pretty easy to follow as long as you read through it and do a nice mise en place and get your self all ready so you do not have to stop to butter this, shred that, measure this, etc., etc.  My Souffle bowl is not 1.5 Qt so I did not fill it full, that meant that it did not rise above the line, next time I will fill it to the top.


Here is the recipe from Epicurious:
1/2 cup freshly grated Parmesan
1 cup finely chopped onion
1 large garlic clove, minced
2 tablespoons unsalted butter
2 tablespoons all-purpose flour
1 cup milk
1 cup coarsely grated Gruyère (about 3 ounces)
2 cups mashed cooked sweet potatoes (about 1 1/2 pounds)
4 large eggs, separated


preparation


Butter a 1 1/2-quart soufflé dish and dust it with 1/4 cup of the Parmesan. In a large heavy saucepan cook the onion and the garlic with salt and pepper to taste in the butter over moderately low heat, stirring, until the onion is softened, stir in the flour, and cook the roux, stirring, for 3 minutes. Add the milk in a stream, whisking, and simmer the mixture, whisking, until it is thickened. Remove the pan from the heat, whisk in the Gruyère, whisking until the cheese is melted, and whisk in the sweet potatoes and the egg yolks, 1 at a time. In a bowl with an electric mixer beat the egg whites with a pinch of salt until they just hold stiff peaks, whisk one fourth of them into the sweet potato mixture to lighten it, and fold in the remaining whites gently but thoroughly. Pour the mixture into the prepared soufflé dish, sprinkle the remaining 1/4 cup Parmesan over it, and bake the soufflé in the middle of a preheated 375°F. oven for 45 to 50 minutes, or until it is puffed and golden. Serve the soufflé immediately.
Serves 4-6


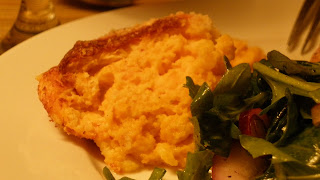
I served this dish as a side to a roasted pork loin wrapped in bacon and a salad of arugula and red onion in a light vinaigrette.  It was light and fluffy, the sweet potato taste came through as did the Gruyere.  I might suggest a bit less Parmesan, maybe a 1/8 of a cup on top.  But all done, this dish ROCKED!


SUCCESS!

15 December, 2009

Success: Chicken Pot Pie by Ina Garten (aka: the Barefoot Contessa)


So happy that this turned out as good as it did.  I am a HUGE fan of the Barefoot Contessa and watch her show all the time.  
I have not purchased one of her cookbooks, but I download her recipes often and have had mostly positive results.  
Occasionally there is a step missing (Caramels with Sel).  
This was not the case with the chicken pot pie, it is easy and amazing.


I did a test run the night before as I planned to serve this for lunch the next day.  I followed the recipe and it was perfect.  
Now for my lunch run I did take a few shortcuts that I can admit....  
I bought market baked chicken so I could cut that step out.  
You need them freshly cooked to keep them moist and you must trust that the butcher you use knows how to bake a chicken!  
I mixed half breast meat half thigh meat which I think made it juicier.  
I also used store bought puff pastry which saved some time and was great.  
I just added the chicken mix, hot into a bowl, then covered it with puff pastry and an egg wash on both sides of the pastry (top and bottom).  
Then I put the whole thing in a 400 F oven for 20 minutes, PERFECT!


Guests commented on the whole onions and the moist chicken meat.  A real crowd pleaser.  Will be doing this again soon!


Ingredients
3 whole (6 split) chicken breasts, bone-in, skin-on
3 tablespoons olive oil
Kosher salt
Freshly ground black pepper
5 cups chicken stock, preferably homemade
2 chicken bouillon cubes
12 tablespoons (1 1/2 sticks) unsalted butter
2 cups yellow onions, chopped (2 onions)
3/4 cup all-purpose flour
1/4 cup heavy cream
2 cups medium-diced carrots, blanched for 2 minutes
1 (10-ounce) package frozen peas (2 cups)
1 1/2 cups frozen small whole onions
1/2 cup minced fresh parsley leaves
For the pastry:
3 cups all-purpose flour
1 1/2 teaspoons kosher salt
1 teaspoon baking powder
1/2 cup vegetable shortening
1/4 pound cold unsalted butter, diced
1/2 to 2/3 cup ice water
1 egg beaten with 1 tablespoon water, for egg wash
Flaked sea salt and cracked black pepper


Directions
Preheat the oven to 350 degrees F.
Place the chicken breasts on a baking sheet and rub them with olive oil. Sprinkle generously with salt and pepper. Roast for 35 to 40 minutes, or until cooked through. Set aside until cool enough to handle, then remove the meat from the bones and discard the skin. Cut the chicken into large dice. You will have 4 to 6 cups of cubed chicken.


In a small saucepan, heat the chicken stock and dissolve the bouillon cubes in the stock. In a large pot or Dutch oven, melt the butter and saute the onions over medium-low heat for 10 to 15 minutes, until translucent. Add the flour and cook over low heat, stirring constantly, for 2 minutes. Add the hot chicken stock to the sauce. Simmer over low heat for 1 more minute, stirring, until thick. Add 2 teaspoons salt, 1/2 teaspoon pepper, and heavy cream. Add the cubed chicken, carrots, peas, onions and parsley. Mix well.


For the pastry, mix the flour, salt, and baking powder in the bowl of a food processor fitted with a metal blade. Add the shortening and butter and mix quickly with your fingers until each piece is coated with flour. Pulse 10 times, or until the fat is the size of peas. With the motor running, add the ice water; process only enough to moisten the dough and have it just come together. Dump the dough out onto a floured board and knead quickly into a ball. Wrap the dough in plastic and allow it to rest in the refrigerator for 30 minutes.


Preheat the oven to 375 degrees F.
Divide the filling equally among 4 ovenproof bowls. Divide the dough into quarters and roll each piece into an 8-inch circle. Brush the outside edges of each bowl with the egg wash, then place the dough on top. Trim the circle to 1/2-inch larger than the top of the bowl. Crimp the dough to fold over the side, pressing it to make it stick. Brush the dough with egg wash and make 3 slits in the top. Sprinkle with sea salt and cracked pepper. Place on a baking sheet and bake for 1 hour, or until the top is golden brown and the filling is bubbling hot.


SUCCESS!

12 December, 2009

Failure: Crispy and Creamy New Potato Pie by Tyler Florence

After my earlier success I was so excited to try something of Tyler's again.  I watched him make a New Potato Pie on TV that looked so good I decided to make it for our lunch today.


And here is the written recipe from the Food TV Webpage


Ingredients


  • 2 pounds potatoes, washed and halved
  • 1 bay leaf
  • 1 tablespoon freshly grated horseradish (or prepared)
  • 1 cup sour cream
  • 1/4 cup chives, chopped
  • Kosher saltand freshly ground black pepper
  • 1 tablespoon olive oil

Directions

Preheat oven to 400 degrees F.
Wash and boil potatoes in salty water with bay leaf until fork tender. Drain potatoes and mash along with horseradish, sour cream, and chives. Season with salt and pepper.
Put mixture into a 10-inch skillet with 1 tablespoon olive oil and bake until golden and crispy. To serve, invert onto a plate and cut into pieces.

I followed the written instructions to the T and the result was a total failure....
The pie's crispy top stuck solidly to the pan and the potatoes were dry and limp.  I even tried scrapping the bottom of the pan but as we speak it is soaking in the sink... 


In the video he clearly puts the pan on the fire and presses down firm.  I am not sure if that was the step, which they obviously left off the written or if it was something else they left out.  The potatoes themselves were very dry all the way around.  He also didn't specify how much time in the over other than golden and crispy... If the bottom is what he means, well you can not see it until you take it out of the pan.  needless to say, no potato pie for lunch today :(


FAILURE!


Success: Quick Pickled Radishes by Tyler Florence

So for my first test I wanted to try something easy and what could be easier that refrigerator pickles?  I had some radishes come ripe in the garden so it was a good time to try this.


I like Tyler Florence, I watch his show every Saturday morning at 9am and I was lucky enough to meet him once at an event, nice guy, really down to earth.


I am happy to report that this recipe was easy to follow and turned out just like he said.


Ingredients

  • 4 bunches radishes, washed and spit down the middle with a little stem (about 1/2-inch) still attached

Pickling mix:

  • 1 quart champagne vinegar
  • 1 cup white sugar
  • 1/4 cup pickling spices
  • 2 cloves smashed garlic
  • 2 stems fresh wild fennel (optional if you don't have it, or use 2 tablespoons dried fennel seed)

Directions

Take a large deep dish and lay the radishes out in it. In a large pot add the pickling ingredients and bring to a boil. Remove from heat and pour the boiling mix over the radishes in each dish. Cover tightly with plastic wrap immediately and set aside. Once cooled to room temperature, strain and serve.

So I did one thing differently.  Instead of covering them tightly with plastic wrap I put them straight into jars, so I could gift two and keep one.


I must say I tried them today and they are good, a bit sweet but the heat comes through like a radish should.  I wanted more of a spicy Mexican pickled radish but, I am happily going to eat these guys, the're good.


SUCCESS!

11 December, 2009

Lets Start at the Beginning


indeed a very good place to start...


The other day I was looking for a recipe for a pork loin that I had in my fridge. The book I grabbed is one I grab often, well at least to look at pictures... So I took this cookbook of a well known TV personality, we will call her Schmarta, yeah that is it, Schmarta as to not offend. I looked in the index for a recipe for pork loin wrapped in bacon. Armed with the page number I went to that page, but that page was in the vegetable section and not for my pork. I checked it twice and even had someone else look at it. The page number listed in the index was wrong. I moved about 50 pages forward to find the pork section and sadly my recipe was no where to be found. Now there was a similar one but it was pancetta not bacon, NO DEAL SCHMARTA!


It got me thinking, how many times have I been even adventurous enough to open a cook book let alone try to recreate what my idols create every day in print and on television? How many times am I actually successful at following these instructions? Are my failures the result of bad recipes, bad editing or is it, god forbid, ME?


So here I am your novice cook, in my novice kitchen testing recipes from those who dare to share. After spending too much time looking at those cook books and watching those shows on Food TV I am finally happy to announce that I will be testing to see if what you see and read can actually be accomplished by your average house hold variety chef.  Hoping for more success over failure, but my loss will be your gain.


Cheers,
Cenzo